1 Introduction
1.1 Welcome to Automatic Email Processor 
Automatic Email Processor is a powerful Windows application for processing incoming emails automatically. The program monitors mailboxes you specify and, for each new message, runs exactly the tasks you have defined - from saving attachments and printing to sending automatic replies or creating a database entry.
Typical Scenarios
- File incoming invoices automatically by date and invoice number
- Sort order confirmations by supplier into a folder hierarchy
- Send attachments from specific senders directly to a printer
- Forward emails to the responsible department
- Send automatic replies with receipt confirmations
- Write email data (sender, subject, date received) to a SQL database
- Extract ZUGFeRD and XRechnung files from emails and file them
- Move newsletters and advertising automatically to an archive folder
- Work with Microsoft 365 (Graph), classic IMAP or POP3
1.2 Starting the Program 
After installation, start Automatic Email Processor from the Start menu or the desktop shortcut. On first start no profile and no email account are set up yet - the program opens the main window with an empty profile list.
Tip: You can configure the program to start automatically with Windows. You will find this setting under Menu -> Options… -> General.
1.3 The Main Window at a Glance 
The main window is divided into five areas:
- Menu and toolbars (top) - main menu, buttons for profile management, search and filter
- Profile list - overview of all configured profiles with status, task type and monitored folders
- Log toolbar - filter, Excel report, CSV export, postponement manager
- Log list - processing log, grouped by result (success, error, no match, postponed, unreachable)
- Status bar (bottom) - profile counter, filter state, entry count, status and the Check now button
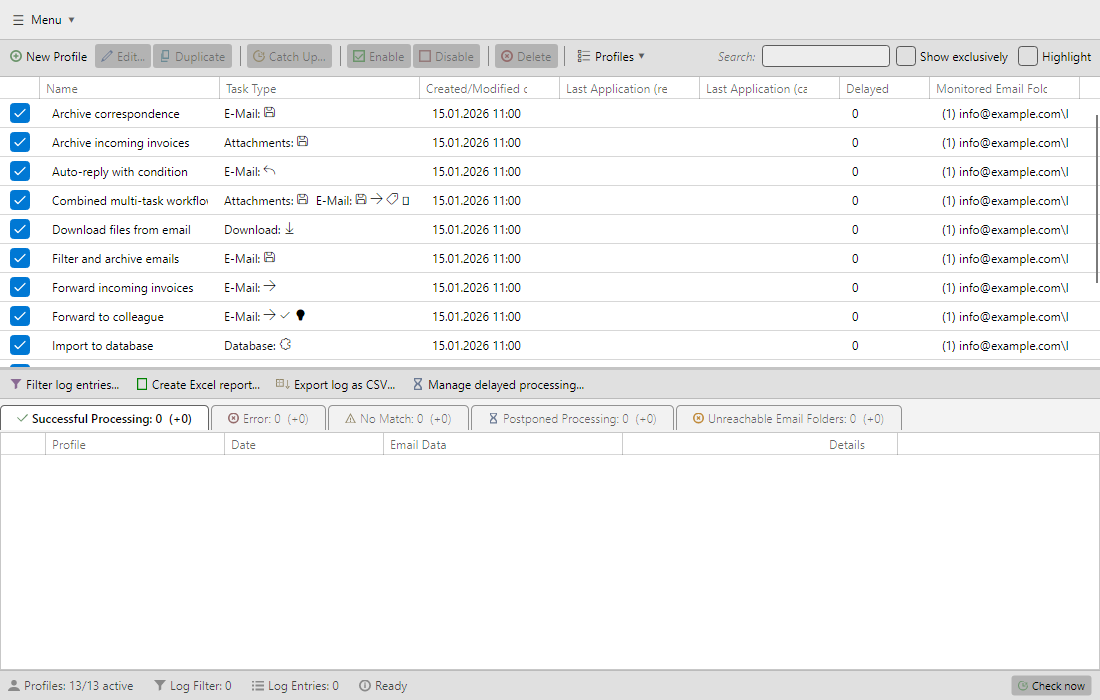 Main window with profile list on top, log list at the bottom and toolbars in between, plus the status bar along the bottom edge
1.4 Basic Principle: Profiles 
Working with Automatic Email Processor is based on profiles. A profile combines three areas:
- Monitored folders - the email accounts and folders whose incoming messages should be checked
- Filters - conditions that determine which messages a profile applies to (e.g. sender, subject, attachment, importance)
- Tasks - the actions executed for a matching message
You can create any number of profiles. Each profile works independently, can monitor several mailboxes and can run several tasks. An incoming message is checked in turn against all active profiles, so even complex processing chains can be modelled.
Example: Simple Archiving Profile
A typical profile for archiving incoming invoices automatically could look like this:
- Monitored folder: Inbox of the account
rechnungen@firma.de
- Filter: Attachment is a PDF file whose name contains “Invoice”
- Task: Save attachment to
D:\Archiv\Rechnungen\<EmailYear4>\<EmailMonth>\<SenderName>_<EmailDay>.pdf
- Task: Move email to the folder
Archive\Invoices
- Task: Send an automatic reply with a receipt confirmation to the sender
1.5 Getting Started 
1. Set Up an Email Account
Before you can create profiles, you should configure at least one email account under Menu -> Options… -> Email Accounts. Alternatively, the task editors offer a New Account button that lets you create an account directly from within the profile. Microsoft 365 (Graph), IMAP and POP3 are supported. You will find detailed instructions in chapter 50.
2. Create a New Profile
In the profile toolbar, click New Profile. The Profile Settings window opens.
3. Specify the Monitored Folder
Switch to the Monitored Folders category and add one or more folders from the configured accounts.
4. Set Filters (optional)
If not all messages should be processed, define corresponding criteria under Message Filter (see chapter 30).
5. Enable Tasks
Under the task categories, enable the desired actions and configure them to suit your needs.
6. Save and Activate the Profile
Click OK to save the profile. From this point on, it monitors the specified folder or folders.
Important: Messages already present in the mailbox are initially only indexed (marked as “known”) and are not processed automatically. To process existing messages after the fact, use the Catch Up… button in the profile toolbar. Newly arriving messages are processed automatically.
1.6 Processing Flow 
When a new message arrives in a monitored folder, the following process runs:
- Detection - the program detects the new message
- Filter check - it is checked whether the message matches the filter criteria of an active profile
- Task execution - all enabled tasks of the profile are executed in order
- Logging - the result is shown in the log list
- Postponement (optional) - for profiles with a configured delay, processing is performed only after the period has elapsed
Tip: Set the check interval under Menu -> Options… -> Interval. With the Check now button in the status bar you can trigger the next run manually.
1.7 License Model 
The program is available as a demo and a full version. Enter the license key under Menu -> Enter license key….
In the demo version all functions are available, but the number of profiles is limited. The full version has no restrictions.
1.8 Help and Support 
If you have questions or problems, the following resources are available:
- Online help: choose Menu -> Help
- Step-by-step guides on the manufacturer’s website
- Email support: info@gillmeister-software.de