40.12 Email Accounts
40.12.1 Overview 
In the Email accounts area you manage all mailboxes that are set up in the program. An account is configured once here (server address, credentials, security options) and can then be referenced in any number of profiles as a monitored mailbox or as a sending account.
Three account types are supported: IMAP, Microsoft 365 (Graph) and POP3. A detailed description of the setup can be found in Chapter 50.
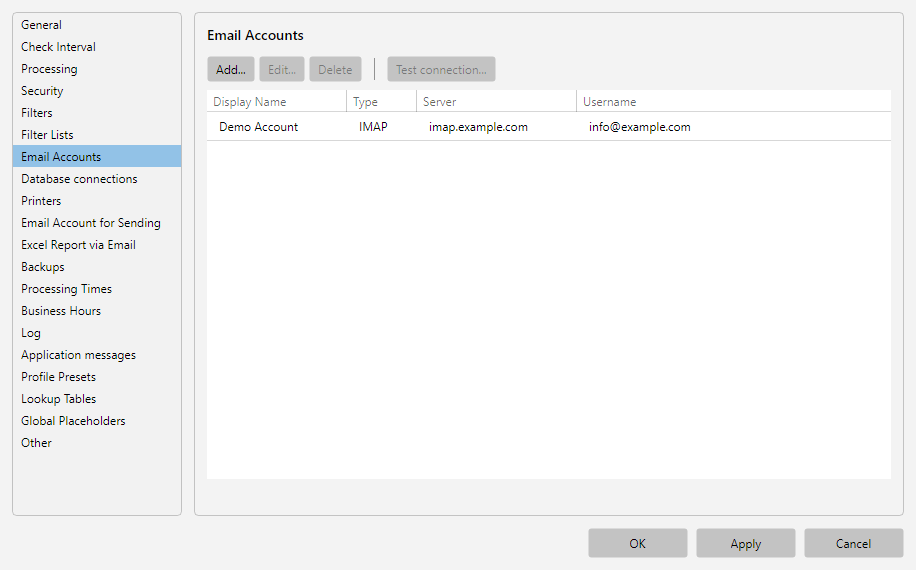 Program options, Email Accounts area: list of configured accounts with account type, status and test-connection button
40.12.2 Toolbar 
| Button |
Effect |
| Add… |
Opens the account editor to create a new account |
| Edit |
Opens the selected account for editing |
| Remove |
Removes the selected account. If the account is still referenced by profiles, a prompt with a list of affected profiles appears |
| Test connection |
Checks whether the server connection works with the stored credentials. The result appears in the status line at the bottom |
| As default account |
Designates the selected account as the default account of this installation (star symbol in the list). On the current default account, the label changes to Remove as default account. See below for details |
A double-click on an entry opens the editor.
40.12.3 List Columns 
| Column |
Description |
| Display name |
The user-assigned name (e.g. “Incoming invoices”) |
| Type |
IMAP, Microsoft 365 or POP3 |
| Server |
Incoming server address |
| Username |
Login name on the server |
Multiple accounts of the same type are possible - such as two Microsoft 365 accounts for different mailboxes or several IMAP accounts for different supplier mailboxes.
40.12.4 Sender Identity and Reply Address 
In the account editor, three optional fields can be filled in that decouple the sender and the reply address from the pure login name:
| Field |
Description |
| Sender name |
Display name that appears in the From field of the outgoing email (e.g. “Mustermann Company”). If the field is empty, only the address is shown in the From field |
| Sender address |
Address that the recipient sees in the From field. If the field is empty, the login name is used as the sender address |
| Reply to |
Address(es) to which recipient replies are directed (Reply-To header). Multiple addresses can be separated by comma or semicolon. If the field is empty, replies go to the sender address |
Use case - IONOS/Strato setup: Hosters often require login with a technical user (e.g. customer123), but also accept mailboxes like info@company.com when sending. By entering info@company.com as the Sender address, the recipient sees the official address instead of the technical login identifier.
Use case - central sending address, replies to a distribution list: Sending uses noreply@company.com, but replies should go directly to the team distribution list team@company.com. The distribution list address(es) are entered in Reply to.
The values apply uniformly to all sending paths of the account: forward, automatic reply, read receipt, profile notifications, malfunction notification and Excel report delivery.
40.12.5 Default Account of This Installation 
Using the As default account button, exactly one account can be designated as the default account of the respective installation (indicated by a star symbol in the list). Instead of a fixed account, the following places can then use the entry Default account of this installation - at runtime, the program automatically substitutes the designated account:
- Monitored folders in profiles
- the target accounts of the Move email and Copy email tasks
- the sending accounts of the Automatic reply and Forward email tasks
- in the program options, the sending account and the automatic-reply account under Notifications as well as the report account under Excel report by email
What this is good for: If a centrally maintained profile file is distributed to several workstations via profile export, profiles with this setting automatically refer to the account designated on each computer. Readjusting the account assignment after the import (“Re-link account”) is no longer necessary - even when distributing updated profiles repeatedly. When importing from version 3, the former placeholder <DefaultEmailAddress> (including its variants) is automatically converted to the default account.
Notes:
- If no default account is set (or the designated account was removed), processing reports this as an account error with a corresponding notice. For sending accounts, the respective fallback logic applies instead: replies and forwards use the next available sending account, the Excel report uses the first account in the list; notifications are skipped with a notice in the error log.
- The designation applies per installation and is not transferred with exported profiles - this is exactly what makes the profiles portable.
- Running the button again on the current default account removes the designation.
40.12.6 Deletion Protection 
When removing an account, the program checks whether the account is referenced in profiles. The following places are checked:
- Monitored folders in profiles
- Sending account in the tasks Forward, Automatic reply, Copy email and Move email
- Default sending account and Auto-reply account in the program options under Notifications
- Excel report sender in the program options
On matches, a confirmation prompt appears with the number of references. You can still remove the account - the references then become invalid and you must reset them in the affected profiles or options.
40.12.7 Tip 
- For centrally managed profiles (see Chapter 40.6.6) the accounts must be set up separately on each workstation - the central profile file only contains references, the actual credentials are stored locally in
EmailAccounts.json