Step-by-step instructions for automatically forwarding emails with Automatic Email Processor for Windows
This how-to shows how to forward incoming messages automatically to a distribution list or a processor - with your own cover text, filtered attachments, and automatic PDF conversion. The example used here is forwarding incoming invoices to the accounting team.
At a Glance
- Difficulty: Beginner
- Time required: about 10 minutes
- Prerequisites: A profile with a configured email account and monitored folder (see Getting started). The sending account must support SMTP delivery.
- Example: Forward incoming invoices to
accounting@company.com and only attach PDF files containing “invoice” in the file name
Step 1: Add the “Forward email” task
Open the profile in the editor (double-click in the profile list or click Edit…).
- In the task toolbar click Add….
- Select Forward email from the menu.
- The task appears in the task list on the left and is enabled by default.
Tip: A profile may combine several tasks - for example forwarding plus a parallel “Save email” task to keep an archived copy in your own filing system.
Step 2: Enter recipients
In the Forward to field, list the recipient addresses. Multiple addresses are separated by commas:
accounting@company.com, purchasing@company.com
Placeholders are also allowed - for example <SenderAddress> or an address resolved through a lookup table per supplier. This makes it possible to deliver messages dynamically without setting up a separate profile per supplier.
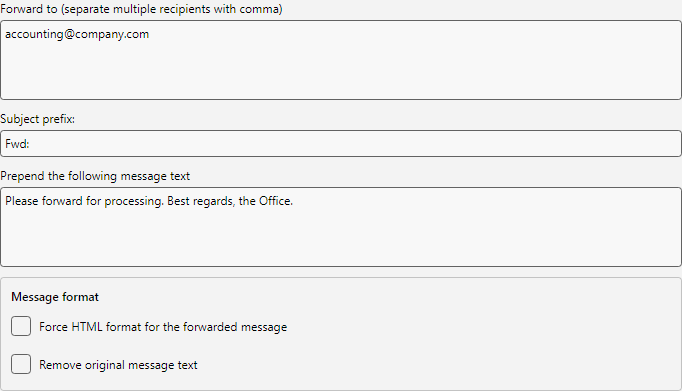 Recipients and cover text
Step 3: Subject prefix and cover text
The Subject prefix field defines a prefix added to the original subject. Common values are “Fwd:” or “FW:”. Leave the field empty to keep the original subject unchanged. The default value adapts automatically to the program language.
In the Prepend message text field, enter an optional note that appears before the original message - for example “Please forward to accounting for processing.” If you paste a complete HTML document (with <html> and <body>), the program detects this and shows a hint in the editor. On send, the outer <html>/<body> tags are removed and the <style> blocks from <head> are carried over into the outgoing message - so a formatted greeting with custom layout can be inserted directly from an HTML editor.
The Message format section offers two options:
- Force HTML format - sends the forward in HTML format, even if the original message was plain text. Useful when the cover text uses formatting.
- Remove original message text - the forward contains only your cover text and the attachments, the original body is not quoted. Use case: you want to forward an attachment but hide internal mail content from the new recipients.
Step 4: Sending account and reply-to address
In the Sending account field, choose the account through which the forward will be sent. By default it shows the AEP default account entry with a hint at the actually resolved account - the sending account configured under Program options → Notifications, or alternatively the account that received the mail. To force a specific sending account (e.g. a dedicated outbound mailbox), pick it explicitly from the list.
 Choose sending account
Tip - decoupling sender identity: If your hosting provider (e.g. IONOS, Strato or 1&1) requires login with a technical user (customer123) but the recipient should see info@company.com in the From field, configure the desired address directly on the account at Program options → Email accounts → Edit → Sender identity (optional). The values apply to every send path of the account.
Tip - redirecting replies: In the same account editor you can set a separate Reply to address. A central sender (noreply@company.com) can then route replies directly to a team distribution list (team@company.com).
Step 5: Forward or filter attachments
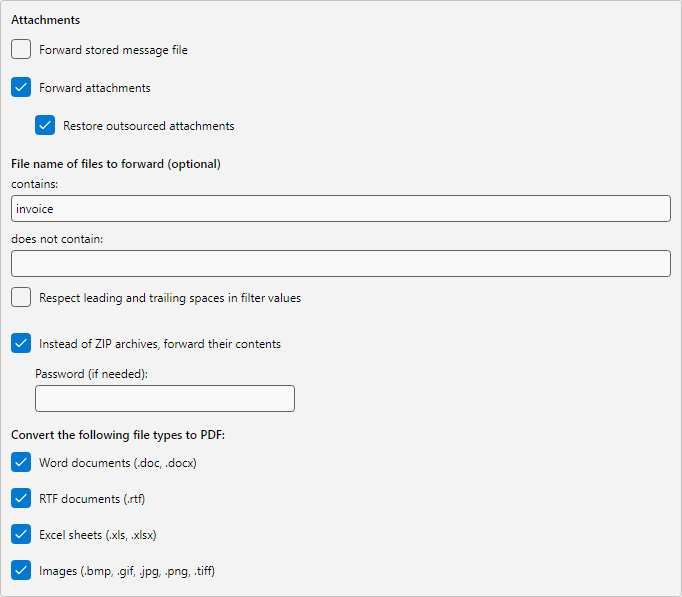
In the Attachments section you decide how the original attachments are handled.
- Forward attachments (default: on) - all attachments of the original message are forwarded. Disable this option if only the message body matters.
- Restore outsourced attachments - if a previous profile has externalised attachments via Replace attachments (visible as
.attlnk files), the program reloads the originals from the storage path and forwards them as real attachments.
- Forward stored message file - additionally attaches the file(s) that a preceding Save email task in the same profile has written - in the format chosen there (PDF, EML, MSG, HTML or TXT). Prerequisite: the Save email task must come before the forward in the same profile. Multiple save tasks lead to multiple attachments - for example a PDF dossier for accounting and an EML original for an archive mailbox.
The file filters narrow the forward down to specific attachments:
| Field |
Example |
Effect |
| File name contains |
Invoice |
Only attachments with “Invoice” in the file name are forwarded |
| File name does not contain |
Banner |
Marketing material is excluded |
Multiple search terms can be combined with <OR> and <AND> - identical syntax to the attachment filter of the Save attachments task.
 Attachment options
Step 6: Extract ZIP archives and convert attachments to PDF
Forward ZIP contents unpacks incoming ZIP archives and forwards the individual files as regular attachments instead of the ZIP itself. For password-protected archives, a password can be stored - it is encrypted at the profile level.
Convert file types to PDF turns Office and image attachments into PDF before sending - useful when recipients should receive a uniform format:
- Word documents (
.doc, .docx)
- RTF documents (
.rtf)
- Excel documents (
.xls, .xlsx)
- Images (
.jpg, .png, .bmp, .gif, .tiff)
Note: The conversion runs entirely inside the program - no Microsoft Office installation is required.
Step 7: Save and test the profile
- Close the profile editor with OK.
- Click Check now in the bottom status bar to trigger the next run manually.
- Send yourself a test email with an attachment, or use Catch up… in the profile toolbar to test the profile against existing mailbox content.
The log list shows for every processed message which recipients received the forward. Double-click an entry to open the processing detail with filter check, recipient list and any error messages from the SMTP delivery.