Step-by-step instructions for setting up an IMAP email account in Automatic Email Processor for Windows
This how-to shows how to add an IMAP mailbox to Automatic Email Processor. IMAP is the standard protocol for most classic email providers (IONOS, GMX, Strato, Web.de, T-Online, Gmail, Outlook.com and many more). Unlike POP3 it keeps the message state (read, moved, flagged) in sync between program and server.
At a Glance
- Difficulty: Beginner
- Time required: about 5 minutes
- Prerequisites: Mailbox credentials (user name, password or app password)
- Outcome: An account that can be picked as a data source in any profile
Step 1: Open the email accounts page
Open the main menu and pick Options…. In the program options, switch to the Email accounts category.
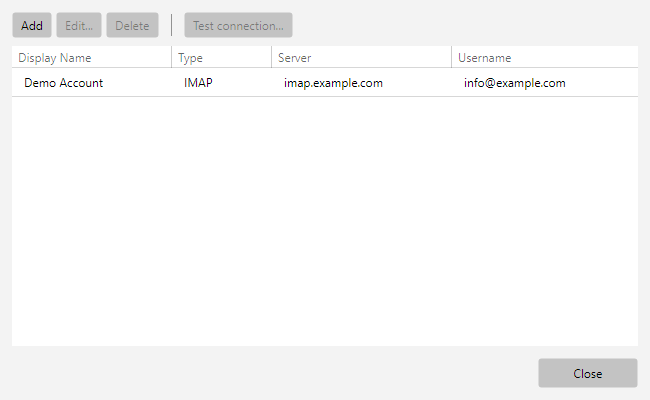
A window opens with the list of all already configured accounts.
 Email accounts
Step 2: Add a new account
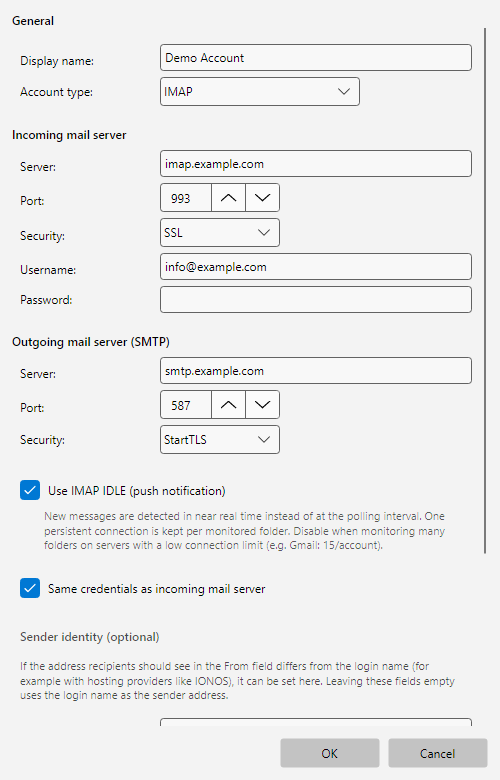
Click Add… in the toolbar. The account editor opens.
- Enter a meaningful display name (e.g. “My inbox” or “Incoming invoices”) - this name appears later in the account dropdown of every profile.
- Select IMAP as the account type.
 IMAP editor with filled fields
Step 3: Enter the server settings
In the Incoming server (IMAP) and Outgoing server (SMTP) sections, enter the values for your provider. The table below covers the most common providers:
| Provider |
IMAP server |
IMAP port |
IMAP security |
SMTP server |
SMTP port |
SMTP security |
| IONOS |
imap.ionos.de |
993 |
SSL |
smtp.ionos.de |
465 or 587 |
SSL / StartTLS |
| GMX |
imap.gmx.net |
993 |
SSL |
mail.gmx.net |
587 |
StartTLS |
| Web.de |
imap.web.de |
993 |
SSL |
smtp.web.de |
587 |
StartTLS |
| Strato |
imap.strato.de |
993 |
SSL |
smtp.strato.de |
465 |
SSL |
| T-Online |
secureimap.t-online.de |
993 |
SSL |
securesmtp.t-online.de |
587 |
StartTLS |
| Gmail |
imap.gmail.com |
993 |
SSL |
smtp.gmail.com |
587 |
StartTLS |
| Outlook.com |
outlook.office365.com |
993 |
SSL |
smtp-mail.outlook.com |
587 |
StartTLS |
Note: Values are correct at the time of writing. Providers can change server addresses or ports - when in doubt, check the provider’s help pages (search query e.g. “IONOS IMAP server”).
Tip: For most providers the user name is the full email address. Exceptions are rare - again, check the provider’s help pages if in doubt.
Step 4: Security and port
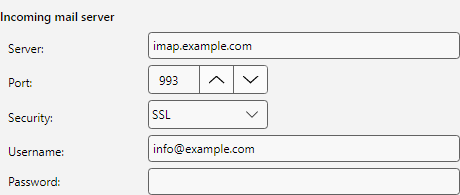
Today’s standard is port 993 with SSL/TLS for IMAP and port 587 with StartTLS or port 465 with SSL/TLS for SMTP. Plain unencrypted connections (port 143 / 25) are no longer accepted by most providers.
In the Security dropdown pick the matching mode:
- SSL - encryption is enforced immediately on connect (recommended for IMAP port 993 and SMTP port 465).
- StartTLS - the provider decides whether to upgrade to TLS (typical for SMTP port 587).
- Automatic - the program picks based on the port - sufficient in most cases.
 Incoming server with server, port and security
Step 5: Authentication
Enter user name and password (in the same block as the server settings from step 4). For most providers you can use the regular account password.
Special case Gmail and Outlook.com: When two-factor authentication is active (today’s standard), the regular account password no longer works - an app password is required. That is a one-time generated key valid only for one application.
Generate an app password for Gmail:
- Sign in at the Google account dashboard: https://myaccount.google.com
- Switch to Security.
- Click App passwords (only shown if two-factor authentication is enabled).
- Pick Mail as the app and Windows computer as the device.
- Copy the displayed 16-character password and paste it into Automatic Email Processor as the password.
Generate an app password for Outlook.com:
- Sign in at the Microsoft account dashboard: https://account.microsoft.com
- Switch to Security → Advanced security options.
- Under App passwords, click Create a new app password.
- Paste the displayed password into Automatic Email Processor.
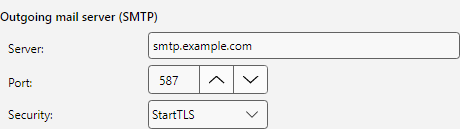
Step 6: Outgoing server (SMTP)
The outgoing server is needed to send replies and forwards. Enter the SMTP values from the table in step 3.
 Outgoing server (SMTP) with server, port and security
By default the option Same credentials for SMTP is enabled - in almost all cases the provider uses the same credentials for incoming and outgoing mail. If your provider requires separate SMTP credentials, untick this option and enter the separate values.
Step 7: IMAP IDLE for real-time detection (optional)
With IMAP IDLE enabled, the server notifies the program for every new message. New mails are detected within seconds instead of waiting for the next scheduled check.
 IMAP IDLE - use push notifications
IDLE is enabled by default. For providers with low connection limits (e.g. Gmail with 15 parallel connections per account), turn off the option if you monitor many folders.
Detailed information is available in online help chapter 50.5 - real-time detection.
Step 8: Send and receive a test message
Click Send/receive test message… at the bottom of the editor. The program sends a short test email to your own address and then tries to fetch it from the incoming server - so IMAP and SMTP are checked in one go.
 Send/receive test message
- Success: A confirmation including a delivery receipt appears - close the editor with OK.
- Send error: Verify server address, port or SMTP authentication. For Gmail / Outlook.com switch to an app password.
- Send OK, receive fails: Verify the incoming server address or port. With many providers delivery takes a few seconds - click the button again.
Step 9: Use the account in a profile
Click OK to close the editor and return to the accounts list. The new account appears with display name, type and server.
To use the account in a profile, open a profile for editing and switch to Monitored folders → Add…. The new IMAP account now appears in the account dropdown. The rest works as described in Getting started.
Common problems
| Problem |
Solution |
| “Login failed” |
For Gmail or Outlook.com switch to an app password (see step 5) |
| Connection refused |
The provider may have IMAP access for third-party apps disabled - enable it under “Settings → External programs / IMAP” in the web mailbox |
| TLS / certificate error |
Verify the server address (typos), especially T-Online (secureimap. as prefix) |
| Outgoing OK, incoming fails |
Check the incoming server address - it is often imap.<provider> instead of mail.<provider> |
| “IDLE not supported” |
Not every provider supports IDLE - turn off the option in the account settings; the program falls back to the regular check interval |
| Account does not appear in the profile dropdown |
Editor closed with OK? The account is only saved in the editor’s memory until you confirm with OK in the accounts list |
Try Automatic Email Processor free for 30 days ...
Download