Getting started - create your first processing profile
Step-by-step instructions for setting up Automatic X-Invoice Processor for Windows
This how-to walks you from the very first program start to a running profile that processes incoming e-invoices (ZUGFeRD/Factur-X, XRechnung) automatically. By the end you will have created a profile with a monitored folder, configured a first task and verified the result in the preview.
At a Glance
- Difficulty: Beginner
- Time required: about 10 minutes
- Prerequisites: Automatic X-Invoice Processor installed; optionally a few of your own e-invoices (the bundled demo comes with sample invoices)
- Example task: Move invoices to an archive automatically, with a descriptive file name
Video tutorial: Getting started (with narration and optional subtitles)
Step 1: Start the program
Start Automatic X-Invoice Processor from the Start menu or the desktop shortcut. As long as no profile exists, the main window shows a getting-started card with the two steps to your first automated invoice processing, plus the Set up demo button.
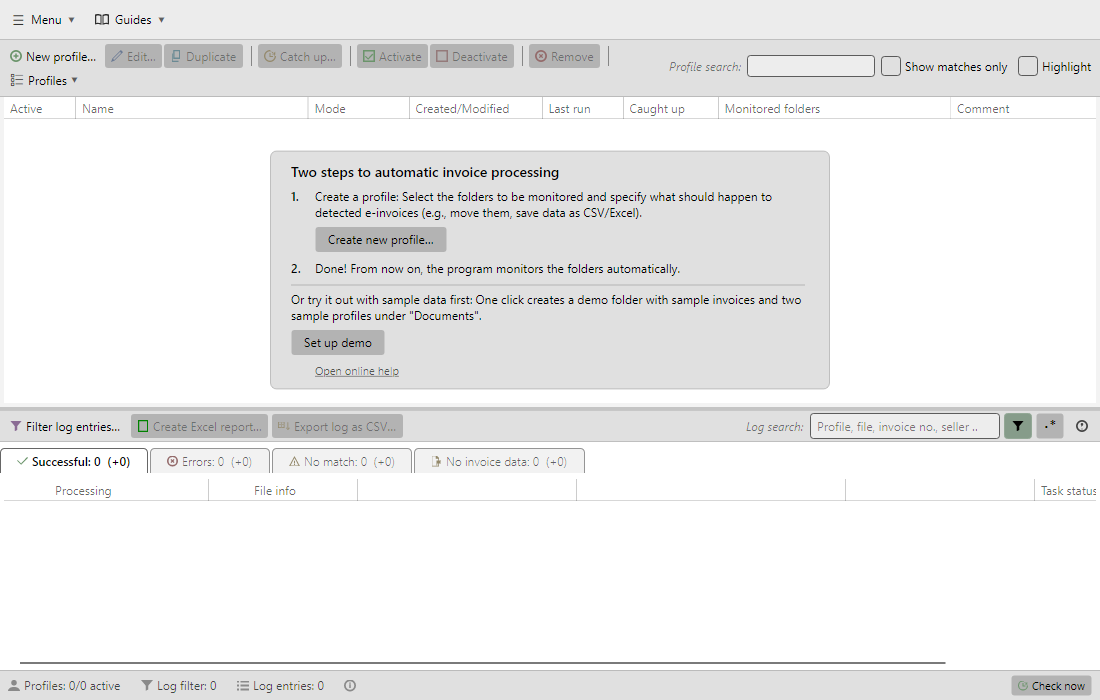 Getting-started card in the main window with an empty profile list
From top to bottom, the main window consists of these areas:
- Main menu and profile toolbar - program-wide functions plus buttons for creating, editing and activating profiles
- Profile list - your processing profiles appear here with status and key data
- Log list - the processing log with the tabs Successful, Errors, No match and No invoice data
- Status bar - status display (e.g. "Next check in X seconds") plus the Check now button
Step 2 (optional): Set up the demo
If you would like to try the program risk-free first, click Set up demo on the getting-started card. One click builds a complete playground:
- A demo folder under "Documents" with the subfolders Invoice inbox and Archive
- Bundled sample invoices (ZUGFeRD PDF as well as XRechnung CII and UBL) in the invoice inbox
- Two sample profiles - Demo: ZUGFeRD invoices (PDF) and Demo: e-invoices (XML) - which move each invoice with a descriptive placeholder file name into a year subfolder of the archive and write the key data to a collective CSV file
Processing starts automatically. The demo profiles are regular profiles: open them by double-click and study mode, tasks and placeholders as a template. When you no longer need the demo, simply remove the two profiles and the demo folder (see chapter 50.3).
Step 3: Create a new profile
In the profile toolbar, click New profile…. The Profile settings window opens with the General category.
- Enter a descriptive name (e.g. "Archive incoming invoices").
- Optionally add a comment and a color for visual distinction in the profile list.
- Leave Profile active checked - otherwise the profile will not process anything later.
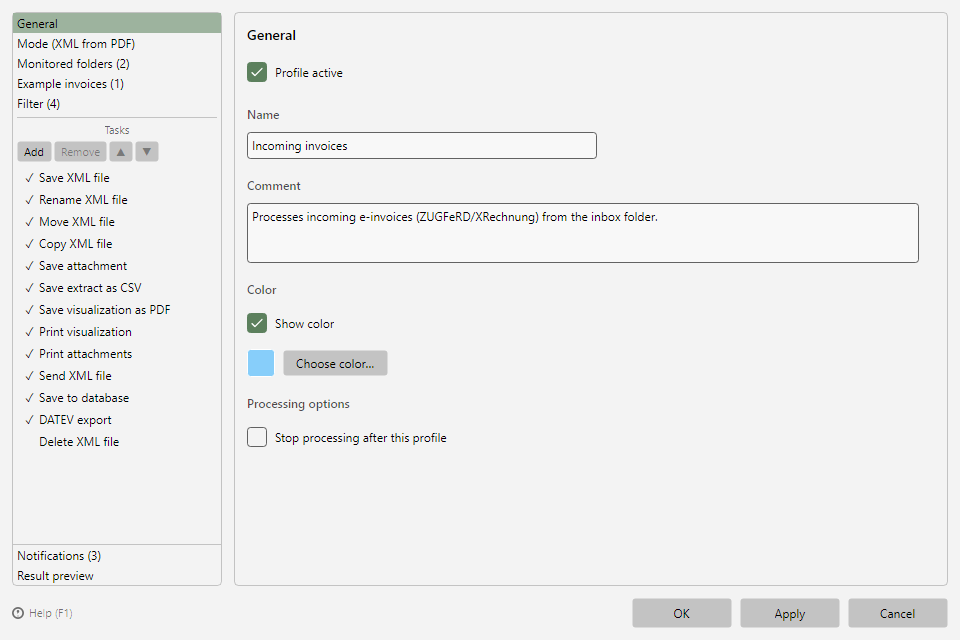 Profile settings, General area
Step 4: Choose the processing mode
Switch to the Mode category on the left. The mode defines which files the profile processes and which file the tasks refer to:
| Mode |
Use case |
| Process XML file (XRechnung) |
Invoice intake via XRechnung (plain XML files) |
| Process PDF file (ZUGFeRD) |
ZUGFeRD/Factur-X PDFs when the PDF file itself is to be filed, printed or forwarded |
| Extract XML from PDF file and process it |
The embedded XML is saved as a separate file; subsequent tasks refer to the extracted XML file |
For this example, choose Process PDF file (ZUGFeRD).
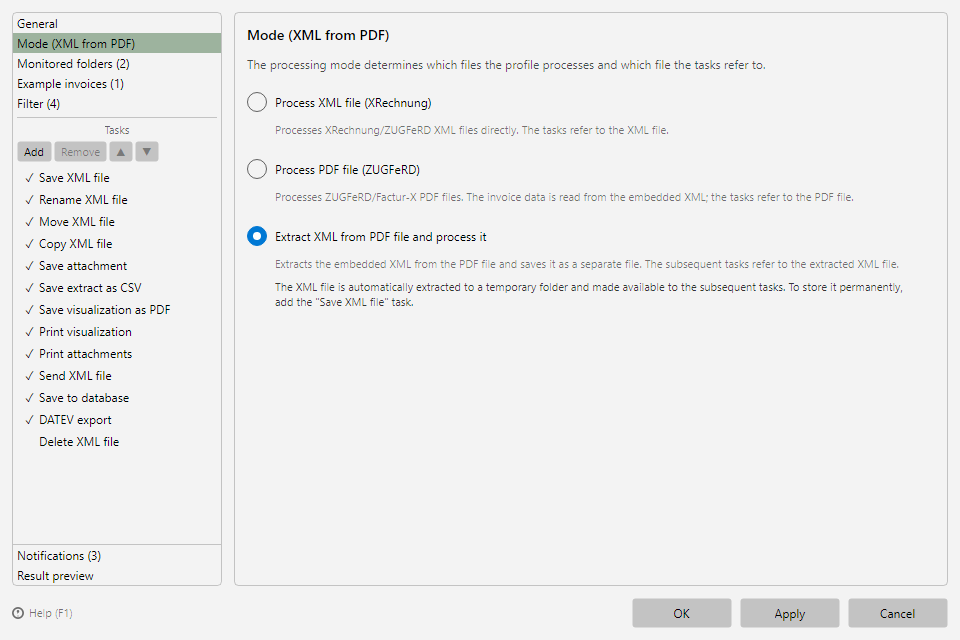 Profile settings, Mode area with the three processing modes
Step 5: Define the monitored folder
Switch to Monitored folders and click Add (folder selection)… to choose the folder where your e-invoices arrive. Use the checkbox in the Subfolders column to include all subfolders if needed.
Tip: With Add (path input)… you enter the path as text - including environment variables such as %USERPROFILE%, so the same profile export works on multiple computers.
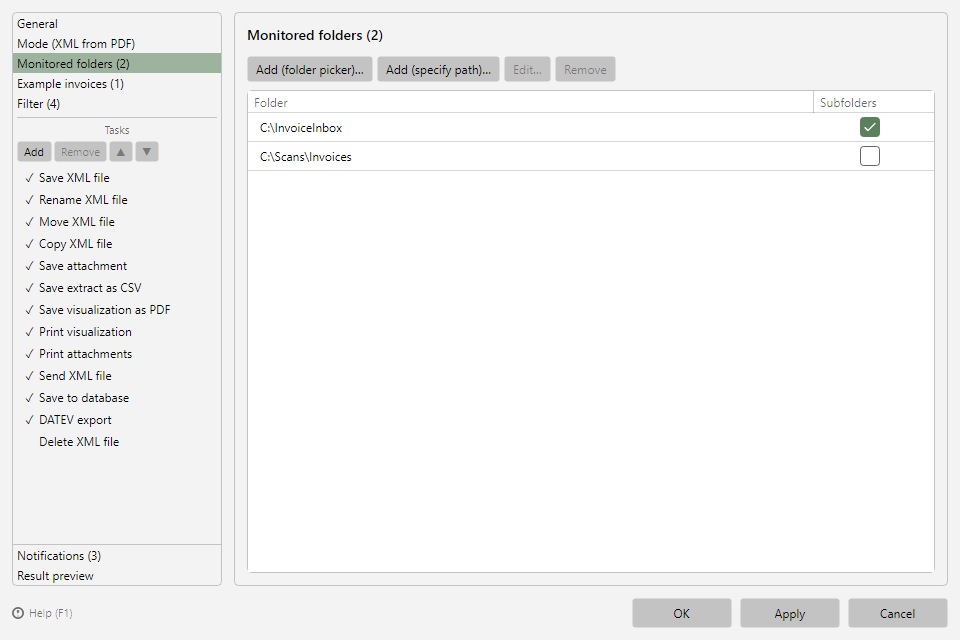 Profile settings, Monitored folders area
Good to know: On first contact with a newly monitored folder, the existing files are not processed but only registered as known - from then on, newly arriving files are processed. This way, adding a folder with thousands of old invoices does not trigger an unwanted mass processing. If existing files should be processed after all, use the Catch up… function later (see chapter 60.2).
Step 6: Add an example invoice
Switch to Example invoices and add a typical invoice file via Add… (e.g. an invoice from the demo folder or from one of your suppliers). Example invoices are only read, never processed - you will use them in a moment to test filter and tasks, and the placeholder previews show real values.
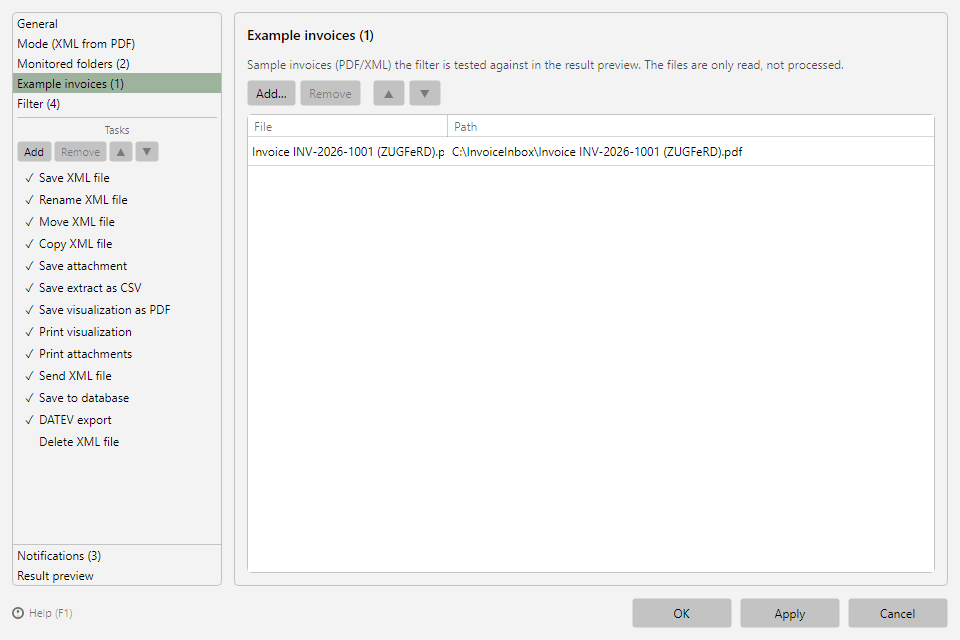 Profile settings, Example invoices area
Step 7: Set a filter (optional)
If only certain invoices should be processed, define criteria (property/operator/value) under Filter, combined with AND/OR - for example "Seller contains Sample Ltd" or "Total amount greater than 500". Without criteria, the profile processes all files of the selected mode. A compact result preview below the criteria list immediately shows for each example invoice whether the filter matches (see chapter 30).
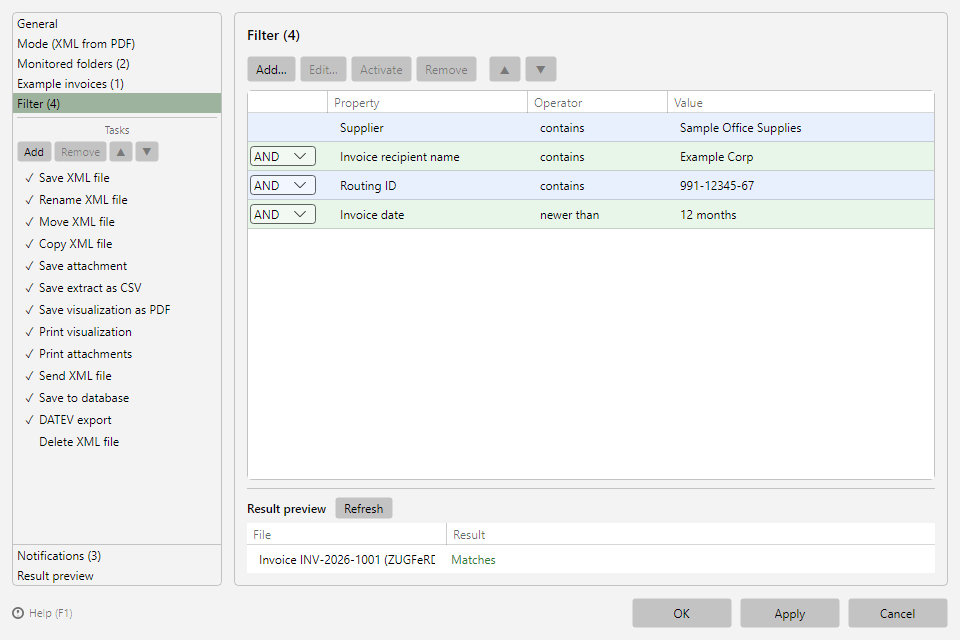 Profile settings, Filter area
Click Add in the task list and choose Move file - the classic basic workflow: process the invoice, then move it to the archive so the inbox folder stays empty.
On the Storage location tab:
- Enter the target directory (e.g.
D:\Archive\Invoices).
- Optionally enter a new file name with placeholders, e.g.
<InvoiceDateComplete> <SellerName> <InvoiceId> - the Insert placeholder button opens the menu of all available invoice placeholders (see chapter 70.1).
- The preview shows the resolved target path based on the selected example invoice.
- Define the conflict behavior if a file with this name already exists (default: Add numbering).
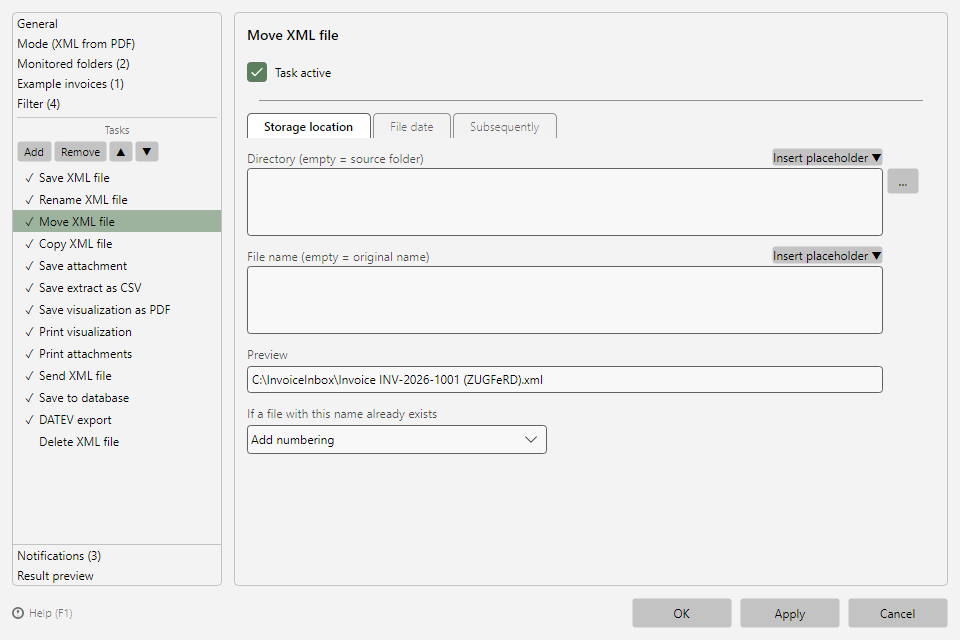 Move file task with the Storage location tab
Other task types include: Save visualization as PDF (readable view of the e-invoice), Save extract as CSV (invoice data as a CSV table), Print file, Send file, Save to database, DATEV export, Copy/Rename/Delete file. You can find a complete overview in chapters 9 to 21 of the program help. The same task type can be added multiple times; the order in the list is the execution order.
Step 9: Check the result preview
Switch to Result preview, select the example invoice at the top and click Refresh. The preview shows - without anything actually being processed:
- the key data read from the file (supplier, invoice date, amount),
- the filter result (for non-matches, including the criterion that fails), and
- the result per task, e.g. the complete target path with resolved placeholders.
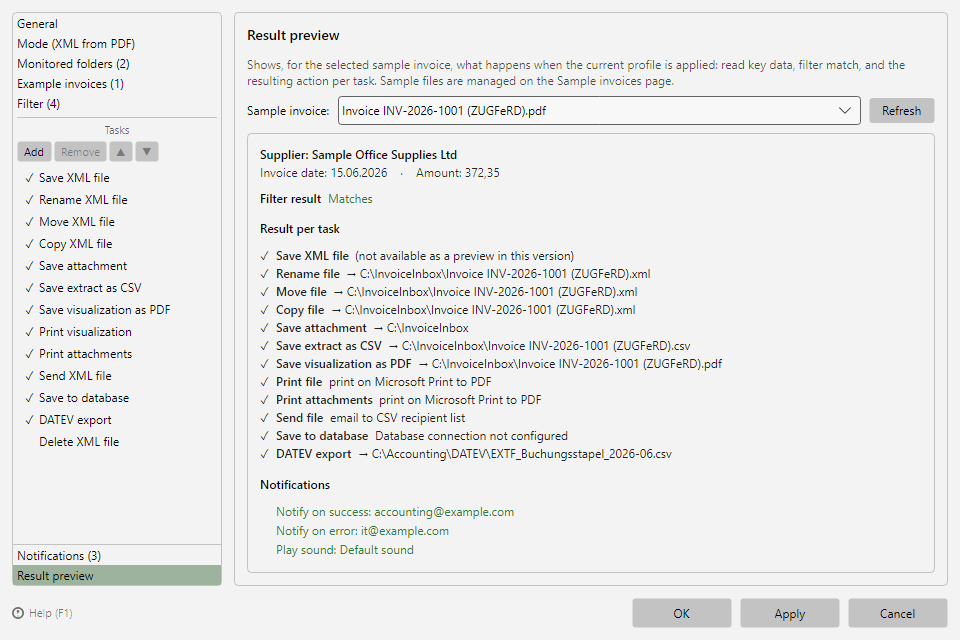 Profile settings, Result preview area
Step 10: Save the profile and check
- Click OK to save the profile. It appears in the profile list.
- Place an invoice file into the monitored folder - or click Check now in the status bar so you don't have to wait for the next check interval.
- Processing runs in the background as long as the program is running - even minimized or in the notification area; the main window does not need to be visible (see chapter 60.1).
Checking the results
Each processed invoice produces entries in the log list (one row per task):
| Tab |
Meaning |
| Successful |
Task was executed successfully |
| Errors |
Task failed or file without readable invoice data - details in the Message column |
| No match |
File was excluded by the profile filter |
Via the context menu of an entry you can open the file, show it in Explorer, process it again after a correction, or add it to the example invoices.
Common issues
| Issue |
Solution |
| Nothing happens although files are in the folder |
Existing files are not processed by design - use Catch up… in the profile toolbar or place a new file into the folder |
| Profile is not active |
Set the checkbox in the profile list or check Profile active in the profile settings |
| File appears under "No match" |
Check the filter criteria - the result preview names the criterion that fails |
| File appears under "Errors" with a hint about missing invoice data |
The file is not an e-invoice in a supported format (e.g. a plain image PDF without embedded XML) - check mode and file format (see chapter 50.2) |
| Wrong target path or file name |
Check the placeholder expression in the result preview, then use Process file again in the context menu |
Further reading
- Program help chapter 1 - introduction with concept overview
- Program help chapter 8 - profile settings in detail
- Program help chapter 30 - filters and filter lists
- Program help chapter 50.3 - getting started and demo data
- Program help chapter 70.1 - list of all placeholders
Start your no-obligation, 30-day free trial of Automatic X-Invoice Processor now ...
Download