Set up as a Windows service
Step-by-step guide to running Automatic X-Invoice Processor as a Windows service in the background
This guide shows how to set up Automatic X-Invoice Processor as a Windows service that runs permanently in the background - without a user having to be logged in or the program window having to be open. This is the right operating mode for servers and for machines that are supposed to process e-invoices around the clock.
The service uses the program AXPProcessor.exe, which is installed alongside the normal program. Afterwards, you only start the main window occasionally to maintain profiles or check the logs.
At a Glance
- Difficulty: Advanced (administrator rights required)
- Time required: approx. 15 minutes
- Prerequisites: Installed program, a Windows user account for the service, administrator rights to confirm the service setup
- Result: Automatic X-Invoice Processor processes e-invoices permanently in the background, even without a logged-in user
Video tutorial: Set up as a Windows service (with narration and optional subtitles)
Note: Is it enough for processing to run while a user is logged in? Then the simpler, unobtrusive continuous operation in the notification area is all you need - see How-to: Autostart and background operation. Further details on service mode (command-line parameters, diagnostics) can be found in the program help, chapter 60.1.4.
Step 1: Choose a dedicated user account for the service
Create a dedicated Windows user account for the service (or use an existing user or domain account). The service will run under this account later.
Do not use the "Local System" account. The reason: settings and permissions in Windows are always tied to a specific user. If the service runs under "Local System", it cannot access exactly these things:
- the profiles, program options, and the license (they are stored in the user's application data folder)
- saved passwords of the email sending accounts (especially when stored in the Windows Credential Manager) and the Microsoft 365 (Exchange Online) sign-in
- network printers (printer connections are set up per user)
In addition, the main window and the service can only see each other (status display, logs) if both run under the same user.
Recommendation: set up a dedicated account such as AXP-Service and assign a password that does not expire.
Log in to Windows once with the service account and start the normal program (AutomaticXInvoiceProcessor.exe). Set up everything here:
- Enter the license.
- Create or import profiles and verify them with a test run (see How-to: Getting started).
- If profiles send emails: verify the sending account with Send test message...; if they print: connect the printer once under this account.
- If monitored folders or storage locations are on network drives: connect the drive once under this account (with "Reconnect at sign-in") - or use the network path (
\\Server\Share\...) in the profiles right away. A service does not see network drives; it only knows the network path behind a drive letter if the drive is connected here.
This step is important: profiles, options, and the license are stored for exactly this user account. The service can later only use what was set up here under its account.
Step 3: Create the service
Still under the service account, start the program and open Options → Windows service. This is where the operating mode, the live status of the service, and all management actions come together.
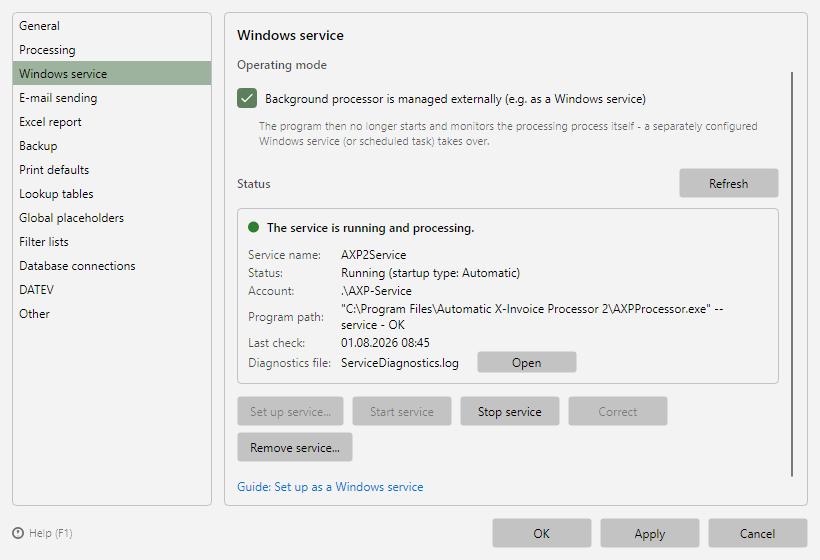 Program options, Windows service page
Click Set up service... and enter:
- Service name: freely selectable,
AXP2Service is suggested.
- Windows user account: the account from step 1, e.g.
.\AXP-Service. For a domain account write Domain\AccountName.
- Password of that account.
After a single administrator confirmation, the program does everything else: it creates the service with the correct program path, sets the automatic startup and the recovery after a crash (three restart attempts one minute apart), grants the service account the Windows right "Log on as a service", and starts the service. The automatic startup is delayed: this way, the service account logon after a restart does not fail because the network is not yet ready.
The password is not passed via the command line, where other programs could read it, but through a short-lived, encrypted file that is deleted again right away. If you are not an administrator yourself, an administrator confirms the Windows prompt with their own account - that works too.
Alternative: setting it up from the command prompt
If you prefer to create the service yourself (e.g. by script on many machines), open a command prompt as administrator. Adjust the path to AXPProcessor.exe to your installation location (the default is C:\Program Files\Automatic X-Invoice Processor 2) and enter your service account from step 1 at obj=:
sc.exe create "AXP2Service" binPath= "\"C:\Program Files\Automatic X-Invoice Processor 2\AXPProcessor.exe\" --service"
sc.exe config "AXP2Service" obj= ".\AXP-Service" password= "YourPassword"
binPath= points to AXPProcessor.exe with the --service parameter.obj= is the user account the service runs under - exactly the account under which you set everything up in step 2. For a local account write .\AccountName, for a domain account Domain\AccountName.
Important: there is a space after binPath=, obj=, and password= - sc.exe requires it that way. Also make sure that binPath= really points to AXPProcessor.exe and not to AutomaticXInvoiceProcessor.exe - with the program interface as the service, the start would hang. If that does happen: the Windows service page detects the mistake and puts it right via Correct.
Even on this route you do not need to configure the automatic start, the crash recovery, or the first start yourself - the program takes care of that for you in the next step.
Step 4: Enable the "External processor" option
So that the main window and the service do not interfere with each other, enable - still under the service account - the checkbox "Background processor is managed externally (e.g. as a Windows service)" at the top of the same page Options → Windows service, under Operating mode. Then close the dialog with OK.
What this option does: the main window assumes that the service handles the processing. It therefore no longer starts and stops its own processing process; it only serves for configuration and for displaying the logs. Without this option, the window would hold back while the service is processing (status bar "Processing by the Windows service") - but it would start processing by itself as soon as the service is stopped.
If you skipped step 3: If no service has been set up at all, the program offers to set one up right away on confirmation - with the same dialog as Set up service....
If you created the service from the command prompt: the program detects on confirmation that it is not yet running and offers to start it right away and, if necessary, set it to start automatically - this also configures the automatic recovery after a service crash. Confirm the prompt with Start service and the subsequent administrator prompt.
Step 5: Verify the service
The quickest overview is the Options → Windows service page itself: the status light is green when the service is running and processing; below it you find the service name, status including startup type, account, and program path. If it is orange or red, the page states the reason and offers the matching action (Start service or Correct).
In addition, you can cross-check:
In the Windows service management console (services.msc), "AXP2Service" should have the status "Running" and the startup type "Automatic (Delayed Start)" (or "Automatic" if you deliberately set it that way). After a restart of the computer, Windows therefore starts the service only about two minutes after booting; until then, the program's status bar shows "External processor - the service will start within ... seconds".
In Task Manager you will see two AXPProcessor.exe processes - this is by design: one is the supervisor (the actual service), the other is the worker process that performs the processing. If a file ever gets permanently stuck, the supervisor only replaces the worker process, and processing continues without intervention.
If there are problems, the file ServiceDiagnostics.log helps - directly accessible via Open on the Windows service page. It is located in the application data folder of the service account:
%AppData%\Automatic X-Invoice Processor 2\ServiceDiagnostics.log
It contains the startup messages; in service operation it shows IsWindowsService=True. If it only shows IsWindowsService=False, the service is not running as expected. The line Profil-Umgebung (profile environment) names the user account and user profile of the service; if it runs as "Local System", a warning appears there as well.
The regular processing and error logs appear in the main window under Log as usual.
Step 6: Set up an early warning for stalls (recommended)
In unattended continuous operation, nobody notices right away if processing ever comes to a halt. Therefore, set up the malfunction notification: the program then automatically sends you an email as soon as no processing has taken place for a defined period - you learn about a problem without having to check yourself. In service operation, the supervisor process performs this monitoring.
Open Options → Processing → Email notifications, enable "Send message if no processing for x minutes", and enter a time span as well as one or more recipients. Sending uses the account from Options → E-mail sending.
Independently of the email, every detected malfunction always appears in the error log and the Windows Event Viewer.
Step 7: Ongoing operation
From now on, the service processes e-invoices permanently in the background - regardless of whether a user is logged in. You only start the main window when needed to change profiles or view logs; the actual processing stays with the service. Closing then really exits the main window, even if "Move to the notification area on close" is set - processing continues in the service.
If you want to stop or remove the service later, use the Stop service or Remove service... buttons on the Options → Windows service page. After removal, the program asks whether it should reset the operating mode as well - otherwise nobody processes any more. The command prompt route still works:
sc.exe stop "AXP2Service"
sc.exe delete "AXP2Service"
When the program is uninstalled, registered processing services are stopped and removed automatically; during an update, the service remains in place - setup stops it briefly and starts it again after the installation.
Common problems
| Problem |
Solution |
| Main window shows no processing status although the service is running |
Service and main window must run under the same user account. The Options → Windows service page explicitly points out a differing service account and shows it under "Account" - it must not say "Local System" there. |
| The "External processor" checkbox is set, but nothing is processed at all |
The Options → Windows service page shows this state in red and names the cause: no service set up, service stopped, or service set up incorrectly. The matching button (Set up service..., Start service, Correct) fixes it with one administrator confirmation. The program also points this out by itself shortly after program start and offers to start or correct the service. If only the autostart is missing (startup type "Manual"), Start service sets it as well (as a delayed start) - sc.exe create alone creates the service with startup type "Manual". |
| Service start hangs indefinitely or fails with error 1053 |
Usually binPath= points to the wrong program file (program interface instead of AXPProcessor.exe). The Windows service page reports "points to the wrong program" - Correct switches the path and starts the service. |
| Service starts and stops again immediately |
Open ServiceDiagnostics.log (the Open button on the Windows service page, or in the AppData folder of the service account, see step 5) - the reason is stated there. |
| Service start fails with logon error 1069 |
Windows could not log on the service account. Usually the password was changed, the account is temporarily locked, or it lacks the "Log on as a service" right. On the Windows service page, click Start service: after the logon failure, the program offers to re-enter the password; in the process, it grants the right again and starts the service. There is no need to remove the service or restart the computer. If the error only occurs after a restart of the server, the network was not yet ready during startup: set the startup type to "Automatic (Delayed Start)" - in services.msc or with sc.exe config "AXP2Service" start= delayed-auto; this is the default for services set up via the program. If a group policy manages the "Log on as a service" right, it may remove the assignment again; add the service account to the policy in that case. If you sign in to Windows with a Microsoft account using a PIN/Windows Hello, Windows may not allow password logon for services; use a local user account in that case. |
The service is running but does not process; ServiceDiagnostics.log shows database errors (e.g. "disk I/O error") |
The application data of the service account is probably located on a network share (folder redirection) - the AppData: line in ServiceDiagnostics.log is then marked with "(NETZWERKPFAD!)". The service cannot use the processing database reliably there; exclude the service account from folder redirection. |
| Two AXPProcessor processes in Task Manager |
By design: supervisor + worker process (see step 5). |
| Network printer does not work in the service |
Printer connections apply per user. Connect the printer once under the service account, then the service recognizes it as well. |
In the service, files on a network drive (e.g. Y:\...) are not found or not saved |
The service only knows the network path behind the drive letter if the drive is connected under the service account on this computer and the program window has run there - typically not the case after importing profiles from another computer. Enter the network path (\\Server\Share\...) in the profiles, or connect the drive under the service account and start the program window once (see step 2). |
| "Local System" was chosen |
This choice does not work (see step 1). Switch to a real user account with sc.exe config "AXP2Service" obj= ".\AXP-Service" password= "...". |
| Status bar shows "Processing by the Windows service" |
The service is running, but the option "Background processor is managed externally" is not set (step 4). Nothing is processed twice - the program window holds back while the service is processing. Set the checkbox anyway; otherwise the window starts processing by itself as soon as the service is stopped. |
| After a restart, the status bar shows "External processor - the service will start within ... seconds" |
Normal with the startup type "Automatic (Delayed Start)": Windows starts the service only shortly after booting (see step 5). |
Start your no-obligation, 30-day free trial of Automatic X-Invoice Processor now ...
Download