Set up autostart and unobtrusive continuous operation
Invoice processing should normally just run along - without an open window, without manual starting. This how-to shows how to set up Automatic X-Invoice Processor so that it starts with Windows, works unobtrusively in the notification area (tray) and processes at the desired interval or time window.
At a Glance
- Difficulty: Beginner
- Time required: about 5 minutes
- Prerequisites: Automatic X-Invoice Processor installed; at least one configured profile (see the how-to "Getting started")
Video tutorial: Set up autostart and continuous operation (with narration and optional subtitles)
How processing works in the background
The actual processing is done by a dedicated background process that the main program starts and supervises (a watchdog restarts it if needed). The practical consequence:
| State |
Processing |
| Main window visible, minimized or in the notification area |
Runs at the configured check interval |
| Program closed via Exit |
Stopped - on the next start, new files of the monitored folders are caught up |
| Outside a configured time window |
Paused until the next window |
So the main window does not need to be visible - the program just must not be exited completely (see chapter 60.1).
Note: If processing should run entirely without a logged-in user (e.g. on a server), set up operation as a Windows service instead - see the program help, chapters 60.1.4 and 40.7 (the "Windows Service" page).
Step 1: Start with Windows and notification area
Open Menu → Options…, page General:
- Enable Start program with Windows - the program will start automatically at logon from now on.
- Enable Move to the notification area on startup - the window does not even appear; the program starts directly into the notification area (tray).
- Enable Move to the notification area on close - clicking the close button only hides the window instead of exiting the program.
- Optional: Move to the notification area when minimizing - minimizing puts the window into the notification area instead of the taskbar.
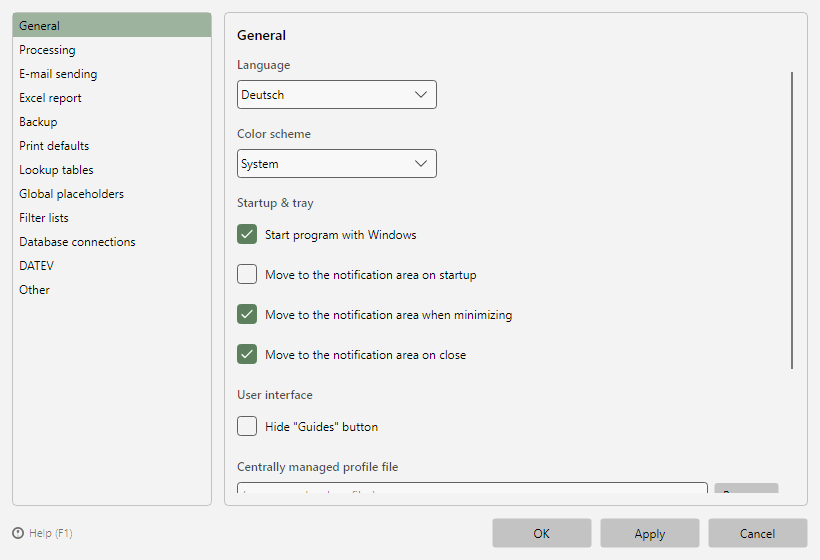 Program options, General page with startup and notification area options
With these settings, processing runs along unobtrusively all the time - exactly the recommendation for continuous operation.
Step 2: Set the check interval
On the Processing page you control the pace:
- Check interval (seconds): time between two checks of the monitored folders. The countdown to the next check appears in the status bar.
- Pause between files (seconds): optional wait time after each processed file - goes easy on slow network drives or printers, for example.
- File timeout without progress (minutes): skips stuck files (e.g. on a blocked print call) as errors instead of halting the processing.
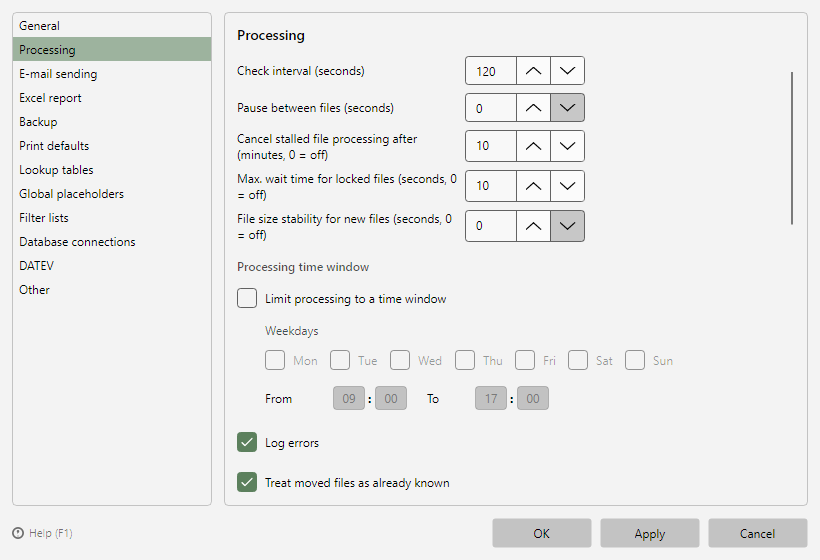 Program options, Processing page
Step 3 (optional): Restrict to a time window
If processing should only run at certain times (e.g. on weekdays during office hours), enable Limit processing to a time window on the Processing page and set the times (From/To) and weekdays. Outside the window the program waits; new files are caught up automatically at the next window.
Step 4 (optional): Notifications per profile
When the program runs invisibly, you still want to be informed about problems. Per profile, email notifications and a notification sound can be configured under Notifications (see chapter 8.12); the email sending method is set up centrally in the program options under Email sending (see chapter 40.8).
Behavior after pauses - what you should know
After a computer restart, standby or the end of a time window, the program automatically processes newly arrived files of the monitored folders - nothing is lost due to pauses. Only the pre-existing stock of a newly added folder is deliberately not processed automatically; use Catch up… in the profile toolbar for that (see chapter 60.2).